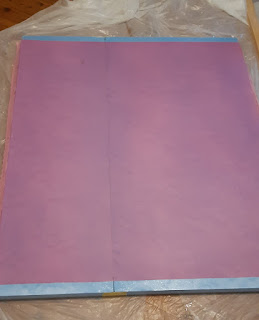
Doesn't look much, but it's the first panel to be laminated on one side with fabric and epoxy. I've been thinking and mildly stressing about it for a while.
I was nervous mixing and applying. Worrying about the ratios and measuring them accurately. The "clock is ticking until it goes off" from the start of mixing makes it feel like it's a rush. Don't delay. But measure and mix well. I mixed two batches. I didn't want too long a gap between the batches in case the first poured onto the fabric started setting before I could finish.
It's easier to coat the foam, place the fabric over and then add more epoxy to the top. I did this at first, but once I had started, I didn't have enough hands to keep the clean fabric off the coated fabric. So I lay all the fabric down and poured the epoxy on top. Much harder to get even coverage. I was getting dry spots. I could force the epoxy through from the top, but it's more time and work. The clock is still ticking. I used a plastic scraper to move the epoxy about and push it through the fabric. Used it like a squeegee to spread the resin out as far as possible.
Start to finish took an hour and used about 440ml of epoxy for about 1m².
The epoxy is mixed by volume. Very inconvenient. I wanted to calculate by weight as using a scale is easier than eyeballing clear liquid into measuring containers.
I got a packet of 250ml and 350ml(?) paper cups. Wooden knives held by the blade with the round end of the handle cut off square (to get into the corners) were used as stirrers and scrapers. I used water and a scale before hand to mark 20ml increments on the out side of a 250ml paper cup. Then transferred the measurements to the rest with a ruler.
With a light positioned above the cup, you can see the liquid level as a shadow on the outside to mark it read measurements.
I poured 80ml into a cup, weighed that, then poured it into the larger cup, scraping out as much as I could with a knife scraper. 3g remained in the cup. Poured another 80ml and emptied it into the large cup. 3ml remained behind. That's 2x part A. Using a new cup and knife scraper, measured 80ml of part B and poured it into the large cup. Again 3ml remained behind.
By the weights, that would be 87+87=174g Part A with 77g Part B. Total weight 251g
(For the second batch I used only the large cup and measured 90+90=180g part A, 80g part B. Total weight 260g.)
On pouring part B into A, I started a timer and using a new knife stirrer, started stirring for two minutes. Then scrapped the edges and bottom and mixed for another two minutes. Called it ready. That's 4 or 5 minutes of the 30 minute working time gone.
Total weight of the two batches: 511g. Not all was used on the fabric, but at least 400g was.
That is way more than I thought it would be. 100gsm fabric, I was working on about the same weight or maybe double, of epoxy. Did I apply it too thick or did the fabric soak up when I was forcing it through? The fabric is 80% polyester and 20% cotton.
I'll have to think about this. Besides the increased weight, I'll need a lot more epoxy. The epoxy was originally purchased to use as a glue for the foam, and as a bonus, in the smallest volume I got, seemed enough to coat the panels as well. I didn't end up using it for gluing, as a one part polyurethane glue was easier to use.
Not sure the epoxy it's worth it. I will still need to paint the epoxy to protect it from UV. It might be better to simplify and skip the epoxy and just use paint and the fabric: also known as "Poor Man's Fibreglass".
I would need a trailer to have enough surface area for sufficient solar panels. I thought of mounting a tool box on a trailer and then attaching a solar panel on the lid.
Problem. The size of solar panels. 100 watt solar panels are about 1 metre long. To get higher output, the size increases to about 1.5 to 1.6 metres. I wanted more than 100 watts. My tent is 1.9 metres long. If I was going to have the length about 1.5m, I might as well go longer so I could sleep on it.
I like sleeping in my tent, but finding a test site is hard. It has to be reasonably flat, no rocks, roots, prickles, grass clumps, dips, water, etc. A trailer has its downsides on the size of it, but it would be an advantage to sleep on top of it and be above all the ground problems.
I spent weeks looking at different designs from western wagons, fold out and pop top trailers, and caravans. Drawing up paper plans and examining how to build them, and the weight, and how they would work day to day. The size to tow behind a bicycle and sleep in or on it added to the challenge. Every decision has consequences and trade offs. Size, weight and cost.
The solar panel on the roof, so I'd have to sleep under it, or have it moved out of the way to sleep where it was mounted. I did consider sleeping on top of it, but couldn't get a working idea. If to move it out of the way, how and where to put it.
Ideally, I'd sleep low down, not very high off the ground for stability. One set of wheels near the middle with a metre on either side doesn't allow a lot of ground clearance going up inclines. I'm using 20" wheels. Can add more wheels, but that increases the weight. Removable wheels and having the trailer sit on the ground is possible, but I decided against that. Without single sided axle wheels, it would be inconvenient to remove and replace the wheels daily. To sleep low, it is between the wheels on the floor. Wheels axles need support. Wheel is 100mm wide at the hub, 25mm for the supports. That is 300mm of the width just for the wheel spacing. Wheelchair wheel hubs are only supported on one side, but this only saves 50mm for significantly increased wheel costs. Ultralight sleeping mats are 520mm wide, but more comfortable is 600mm. Already the trailer is 900mm wide. I'd like the trailer to be thinner, but 600mm for the bed needs a bit extra for movement, say 100mm each side, 800mm is the lowest width that I was happy with. The width of my tent interior. This is without considering the wall thickness or...
The height. Too tall and skinny and the trailer will tip easily. I liked the western wagon design as it allowed the canvas to be raised letting the wind blow through.
A width of 800mm has the wheelbase in contact with the ground at 700mm. 20" wheel axles are 260mm of the ground. The floor would be above that. To sit up in bed needs a minimum of 950mm height. This totals 1210, but ignores the floor, bed and roof thickness. The axle mounts add a bit of height as well. Don't stretch up or move upwards without ducking the head.
I really liked the western wagon design, but settled on a more conventional caravan look. Flat roof for the solar panel. The walls would be 30mm thick laminated foam panels. Plugging this into the constraints, the caravan ends up:
Outside
Width: 960mm
Height: 1500mm
Length: 2200mm (Not including the drawbar and hitch)
Been a long time since the last post. In the way of life, a lot has happened, but not much really. The New Plan Time didn't happen. It started well, but, then I injured my back. ☹️
There's a joke that goes something like this:
One day the different parts of the body were having an argument to see which should be in charge.
The brain said "I do all the thinking so I'm the most important and I should be in charge."
The eyes said "I see everything and let the rest of you know where we are, so I'm the most important and I should be in charge."
"I should be in charge," said the heart, "I circulate oxygen and nutrients all over."
The hands said "Without me we wouldn't be able to pick anything up or move anything. So I'm the most important and I should be in charge."
The stomach said "I turn the food we eat into energy for the rest of you. Without me, we'd starve. So I'm the most important and I should be in charge."
The legs said "Without me we wouldn't be able to move anywhere. So I'm the most important and I should be in charge."
"I should be in charge," said the anus, "I am responsible for waste removal."
All of the other body parts laughed at the anus and insulted him. So he shut down. Within a few days, the brain had a terrible headache, the hands were all shaky, the stomach was bloated, the legs got wobbly, the eyes got watery, and the heart pumped toxic blood. They all decided that the anus should be the boss.
I think the spine was watching with amusement.
Anyone with a back injury knows, when it's bad, everything is painful. Standing, sitting, lying, moving the arms, even waste removal hurts.
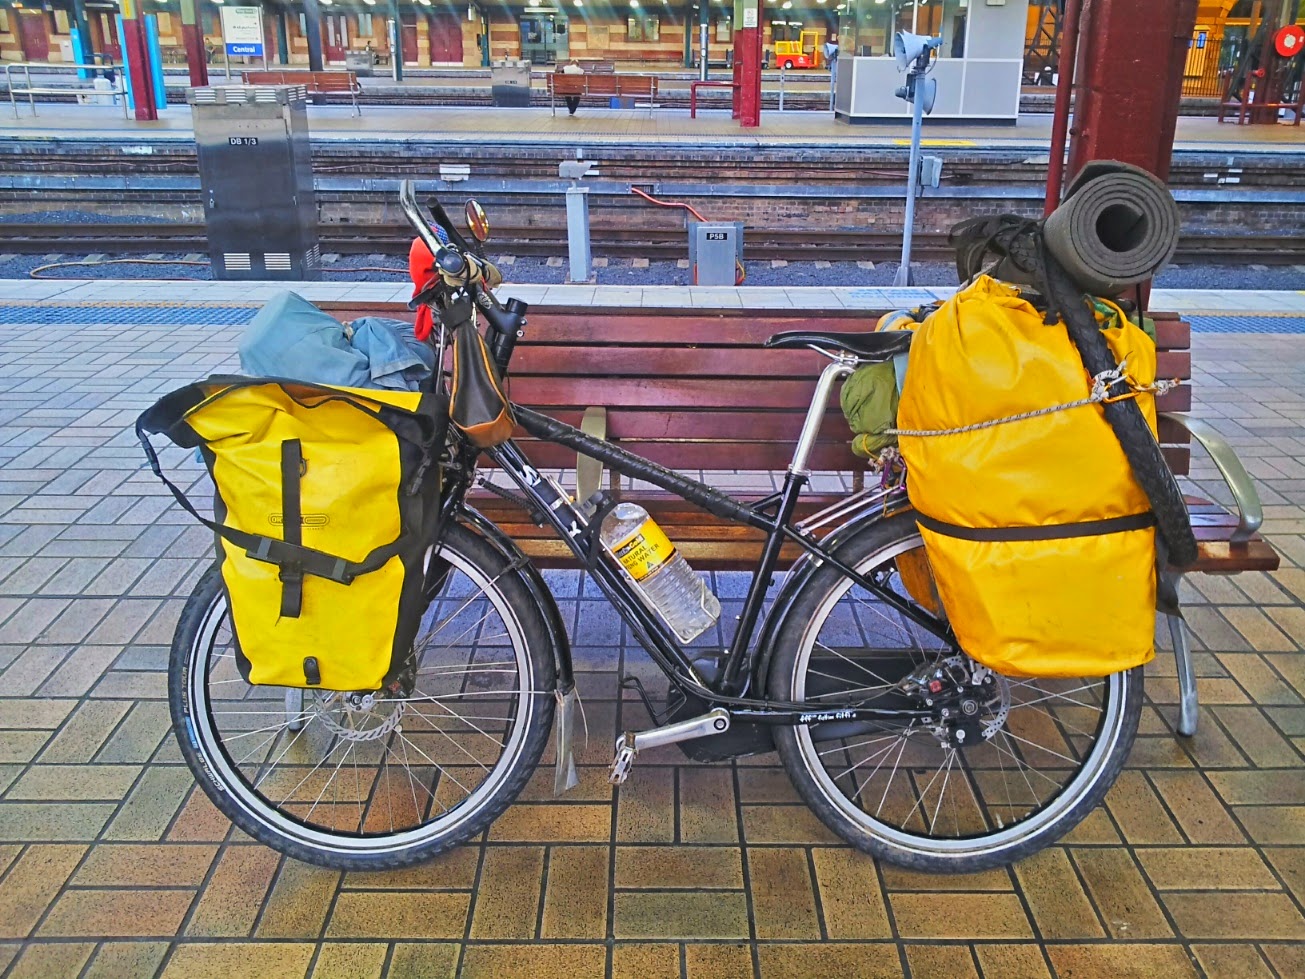
When the pain lessened, a new plan was hatched. I didn't think I'd be able to move my bike and gear about without help. Assistance was needed. I decided to dip my toe into ebikes with a "cheap" upgrade kit. This ended up not being the cheap option it first appeared. I could have bought a new ebike for less, as various components on my bike needed upgrading or changing. Still, I'm happy with the learning experience and I like the frankenstein look of my bike.
Now, I need some way to carry my gear, and power the ebike.
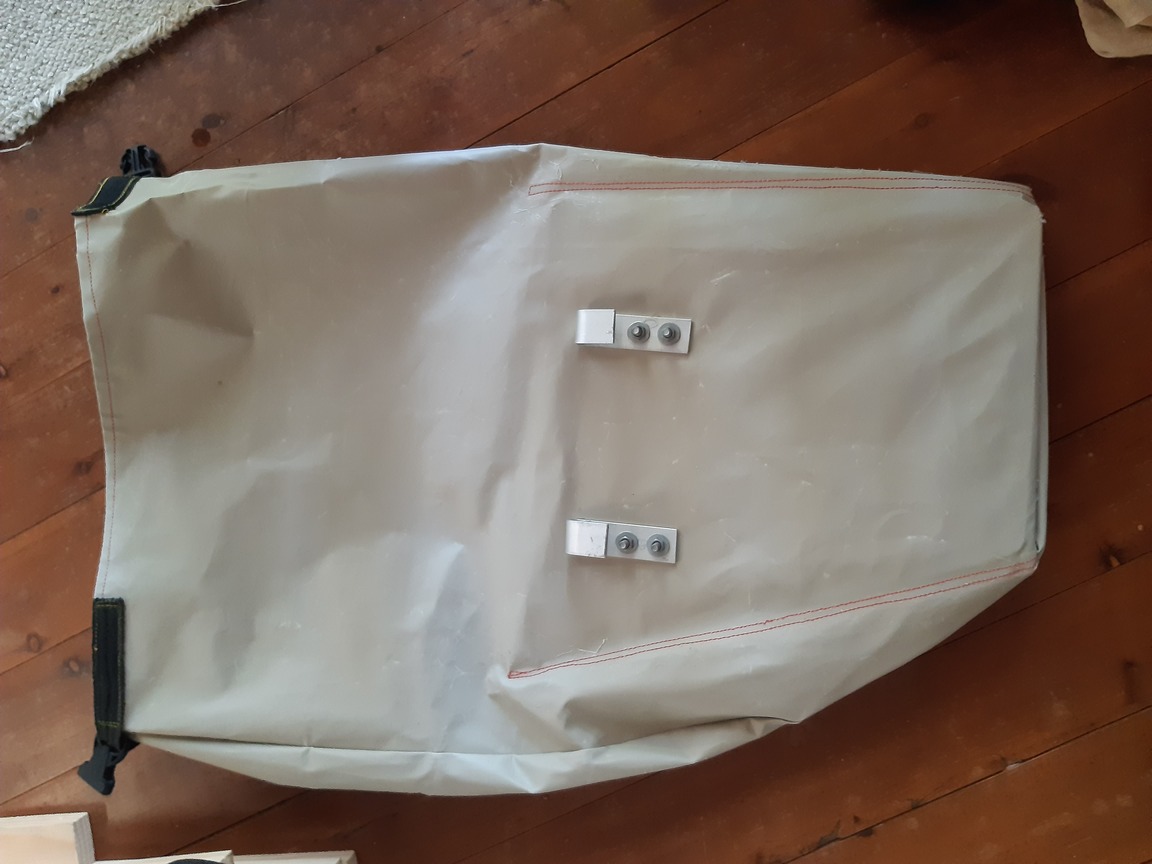
One Ortlieb Back-Roller Classic pannier is 20L. These panniers are approximately 60L each.
It's not my design. Thank Ken. He created the template, and provided the instruction and materials from which my yellow panniers were made. With those, the seams were heat welded - 100% waterproof. The panniers here are sewn, and the seams waterproofed with silicone.
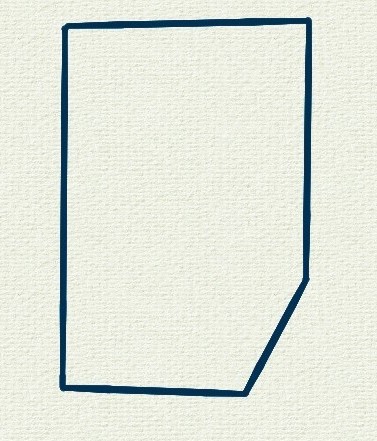
The pattern has minimal seams, and therefor minimal sewing. The basic shape is a rectangle with one corner cut out. The corner cut out provides heel clearance. If the size is scaled down, this might not be a problem.
Order of operations:
Test fabric seam sewing to determine seam allowance required.
Measure out the template with seam allowances.
Fold and cut the fabric.
From the outside side, fold top edge to the inside and hem.
Sew inside sleeve in.
Turn inside out and sew the side seam.
Sew in the bottom.
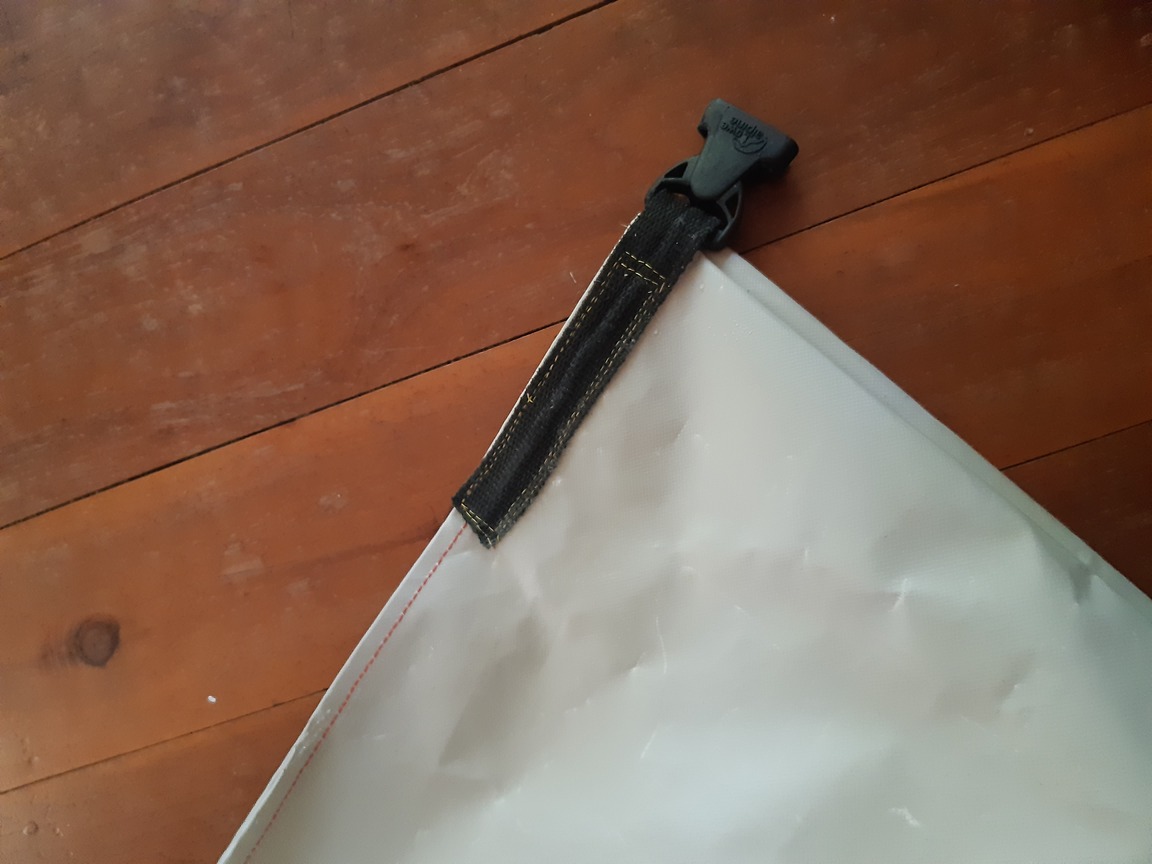
Turn right side out and sew buckles on top edge.
Insert the plastic reinforcener and mark hanger holes for your rack. Check forward-backward for heel clearance.
The triangle cut out is about 380mm tall and 110mm across the base.
Don't forget the seam allowance around the edge. It will vary depending on the fabric and seam type. I used 30mm for a thick canvas (the green material), but 20mm for thinner fabric (beige material).
Fold the fabric in half. Template straight edge goes on the fold. Mark and cut out.
A plastic reinforcener will be held in place by this sleeve. It is to stiffen the pannier and give it its shape.
The plastic insert is 3mm plastic. It's 250mm long at the base. 340mm wide at the top, 340mm tall.
The sleeve is sewn inside the where the pannier will lean against the rack. Make the sleeve material the same size as the insert plus a seam allowance.
Remember the panniers are left and right sided. Sew the sleeve on the correct side of the material.
Base
The base is approximately 300mm x 250 mm including seams. Round the corners. It's worthwhile to check the size of the base against the pannier before cutting it out.
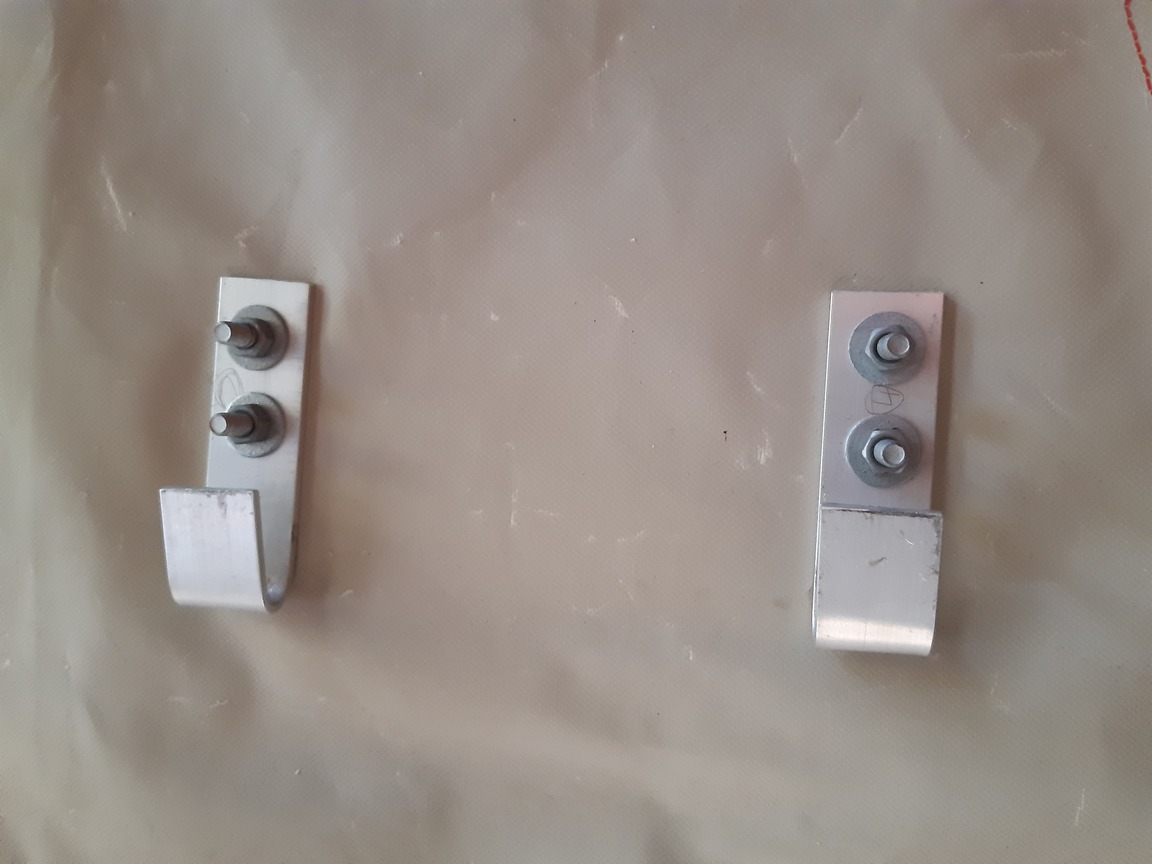
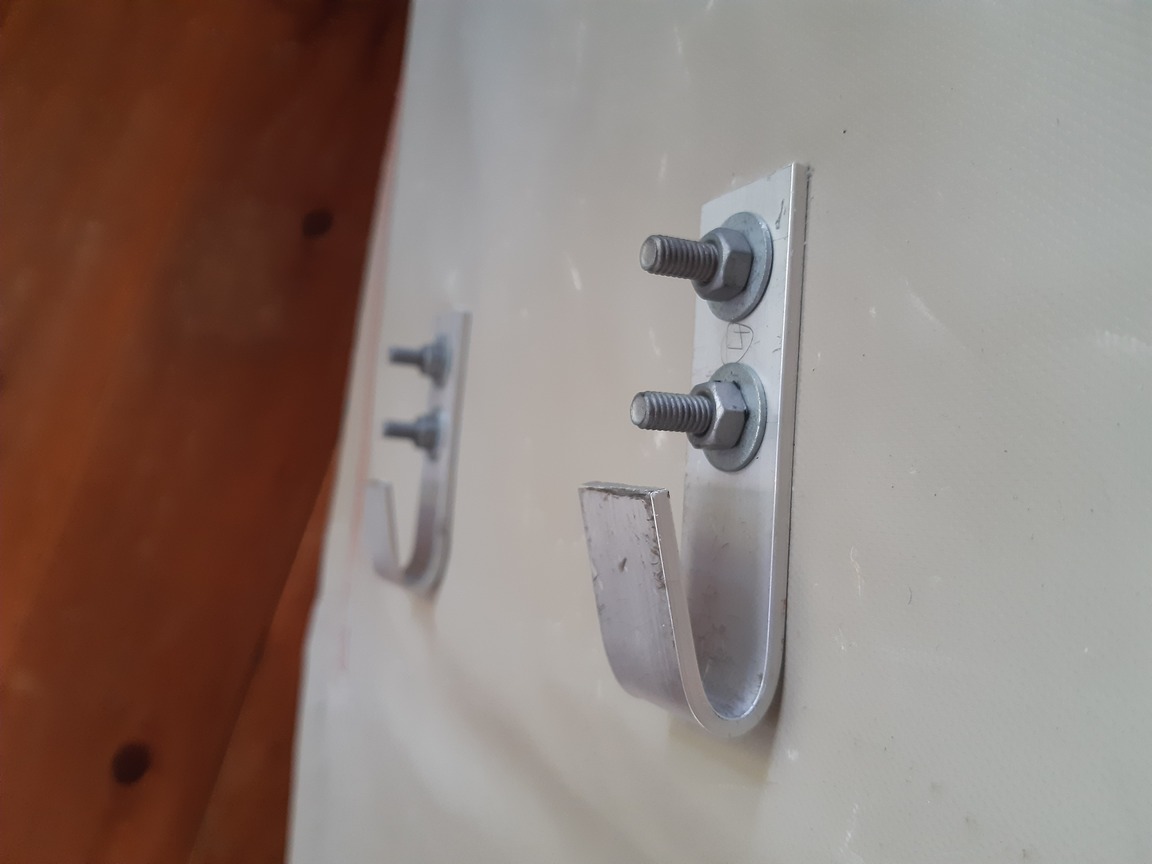
Hangers
Mine are 3mm aluminum flat bar bent into hooks. I used 6 x 30mm hot dipped galvanized bolts with a large washer on the inside. 5mm bolts would have been sufficient.
Use a large washer on the inside.
The bolts go through the sleeve, through the plastic reinforcener, the pannier, then the hanger. I left the bolts long. By sizing the hook length, the bolts protrude and stop the pannier jumping off the rack. Else, attach a elastic loop lower down from the hangers to hook on the rack.
Mix Bunnings Silicone sealant with Mineral Turps (Turpentine). A ratio of about 1:5 silicone to turps. Thinner is better as it soaks into the fabric and doesn't peel off. Mix well, until the silicone disolves in the turps. It should be fluid, like milk. If it is too thick, add more turps. It will mix - keep stirring. Brush on the seams. It will soak into the fabric. Allow to dry - outside.
A new year, and another new baby brushturkey. Mostly at this size they are scratching around in the garden. But occasionally, like the grown ones, they sit on the railing and watch me.
COVID lockdowns are over, but I'm still in Sydney for now. But I have a plan. 2022 will be return to cycling. I'm giving up on walking. I keep injuring needing weeks to recover. Enough of that.
Work is in progress to get a bike ready. And I've been riding more to get some cycling fitness back.